Note: This post is also available on the Keyboard Maestro forum.
This post entry supersedes the original post entry as it includes several significant improvements.
All macros from the original post, and updates prior to today (10-March-2021), can be deleted. Macros from above were installed in the .sys Spaces group. If the group and macros are not deleted, be sure to at least disable the group as some of the old macros will overlap with the new macros below.
Introduction
Mission Control Desktop Spaces, a.k.a. Desktop Spaces, a.k.a. macOS virtual Desktops, can be very useful particularly when using a MacBook. Unfortunately, however, configuration and use of Desktop Spaces can be confusing especially when using three or more (the current macOS maximum is 16). In addition, native macOS does not provide:
- A visual indication of the Desktop number. Moreover, macOS does not include a public API to determine the Desktop number.
- A quick method to switch between non-adjacent Desktops
- An efficient method to move windows to non-adjacent Desktops
The instruction and macros in this post will address these shortcomings and more.
Note: The macro download links in this section will
Quick Start
-
If necessary, using Mission Control, create multiple macOS Desktop Spaces.
-
Configure System Preferences > Mission Control.
-
Configure System Preferences > Keyboard > Shortcuts > Mission Control.
Switch to Desktop 1 .. 9                         ⌃⌥⌘1 .. ⌃⌥⌘9
Switch to Desktop 10 .. 16                       ⌃⌥⇧⌘0 .. ⌃⌥⇧⌘6
-
Download and install the nine primary macros. Primary Macros.kmmacros available on the Keyboard Maestro forum (540.3 KB)
-
Enable the .sys Desktops macro group.
-
[ Required for Move Application Window to Current Desktop (⌃⌘0) ] Download and install the Activate an Application by Name action, available by a custom Keyboard Maestro Plug-in, by @ComplexPoint.
-
[ Optional, but highly recommended ] Download and install the free, open-source application WhichSpace. Set it to start up at login: System Preferences > Users & Groups > Login Items.
-
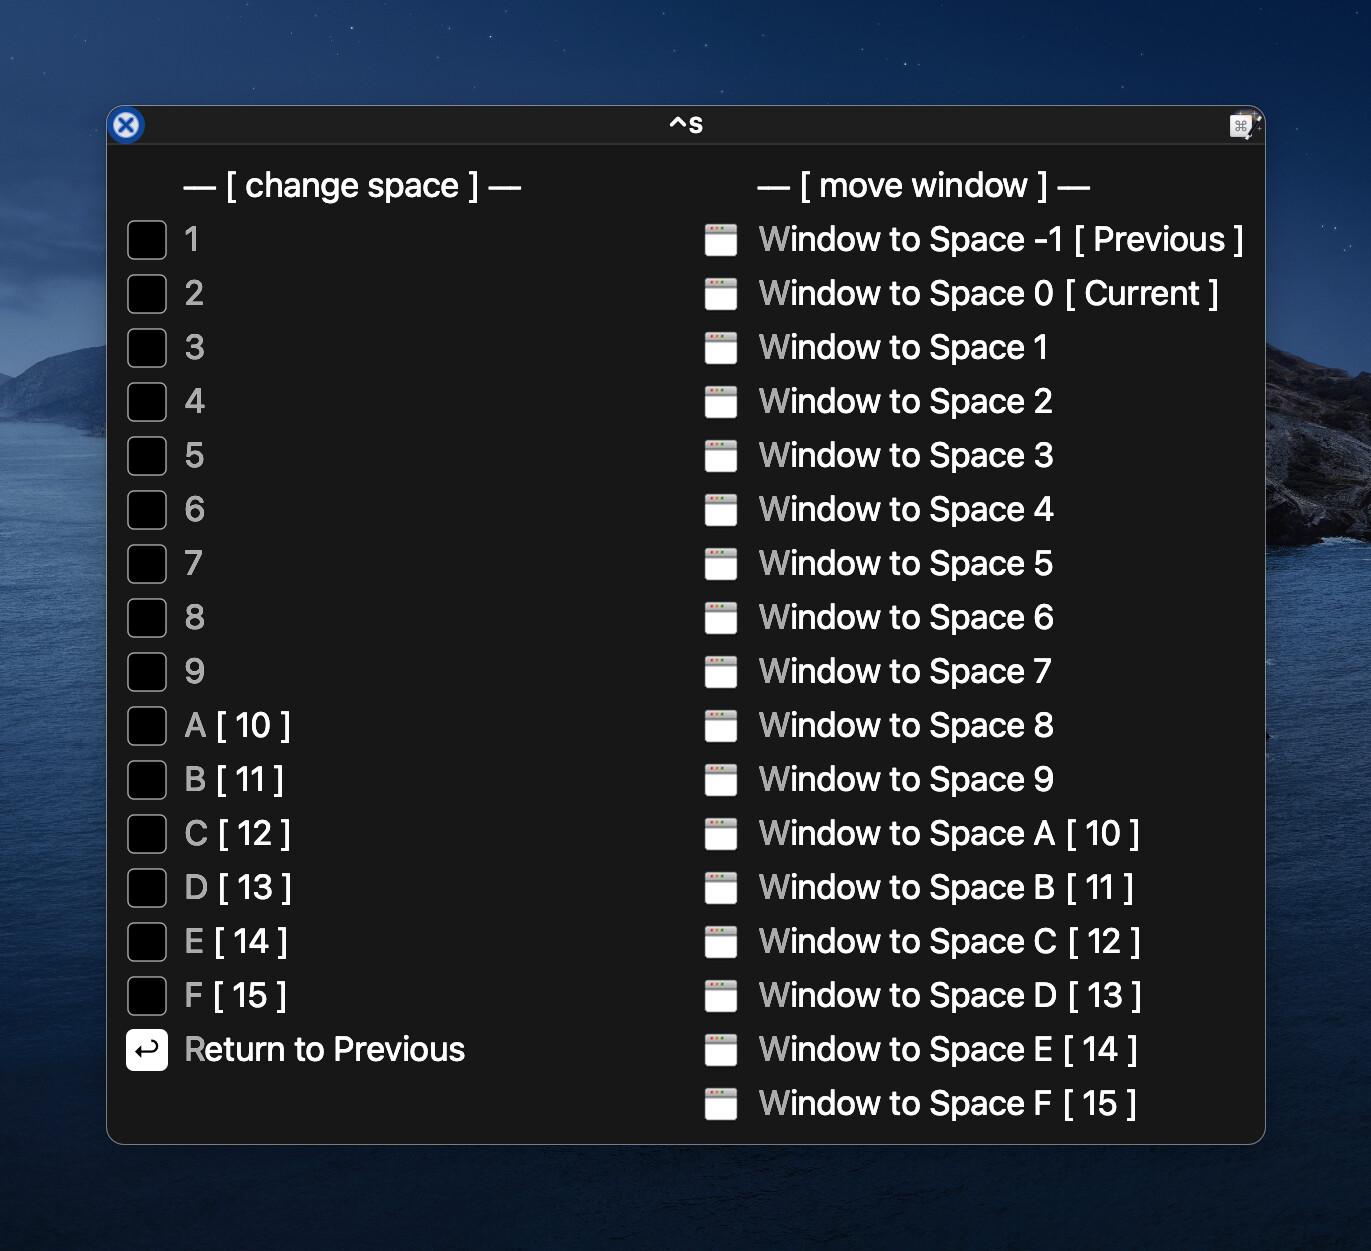
[ Optional, but will be helpful for beginners or occassional users ] Download and install the forty-two Conflict Palette macros. The palette displays the function and hot keys available via the nine primary macros. Palette Macros.kmmacros available on the Keyboard Maestro forum (107.3 KB)
Macro Improvements and Limitations
This set of macros includes several improvements:
- Support for all 16 Mission Control Desktop Spaces
- Macro names include the word Desktop rather than Space since this is a more mainstream term for virtual desktops
- All macros are installed in a group named: .sys Desktops (versus .sys Spaces). Like before the macro group is initially disabled when the macros are downloaded.
- More reliable tracking of the Current Desktop Number since a macro Go to Desktop N (Desktops 1 to 16: ⌃1 .. ⌃9, ⌃⇧0 .. ⌃⇧6) has been added for basic navigation
- Moving desktop right (⌃Right Arrow) and desktop left (⌃Left Arrow) have been improved:
- animation gives better feedback than the macOS native Mission Control Keyboard Shortcuts Move left a space and Move right a space
- thanks to the macro MACRO: HotKey Multi-Press Template, by @Dan Thomas, multiple taps on the arrow keys are recognized
- holding arrow keys repeats the movement left or right until the keys are released
- the previous Desktop is retained to the desktop that was active when the left or right movement began. For example, if one started on Desktop 1, and triple-tapped ⌃Right Arrow to move to Desktop 4 (Desktop 1 → Desktop 2 → Desktop 3 → Desktop 4), subsequent use of ⌃Return would return to Desktop 1 (not Desktop 3).
- For the macro Move Application Window to Current Desktop (⌃⌘0), Applications to Exclude can be configured (by default LaunchBar and Amphetamine are excluded).
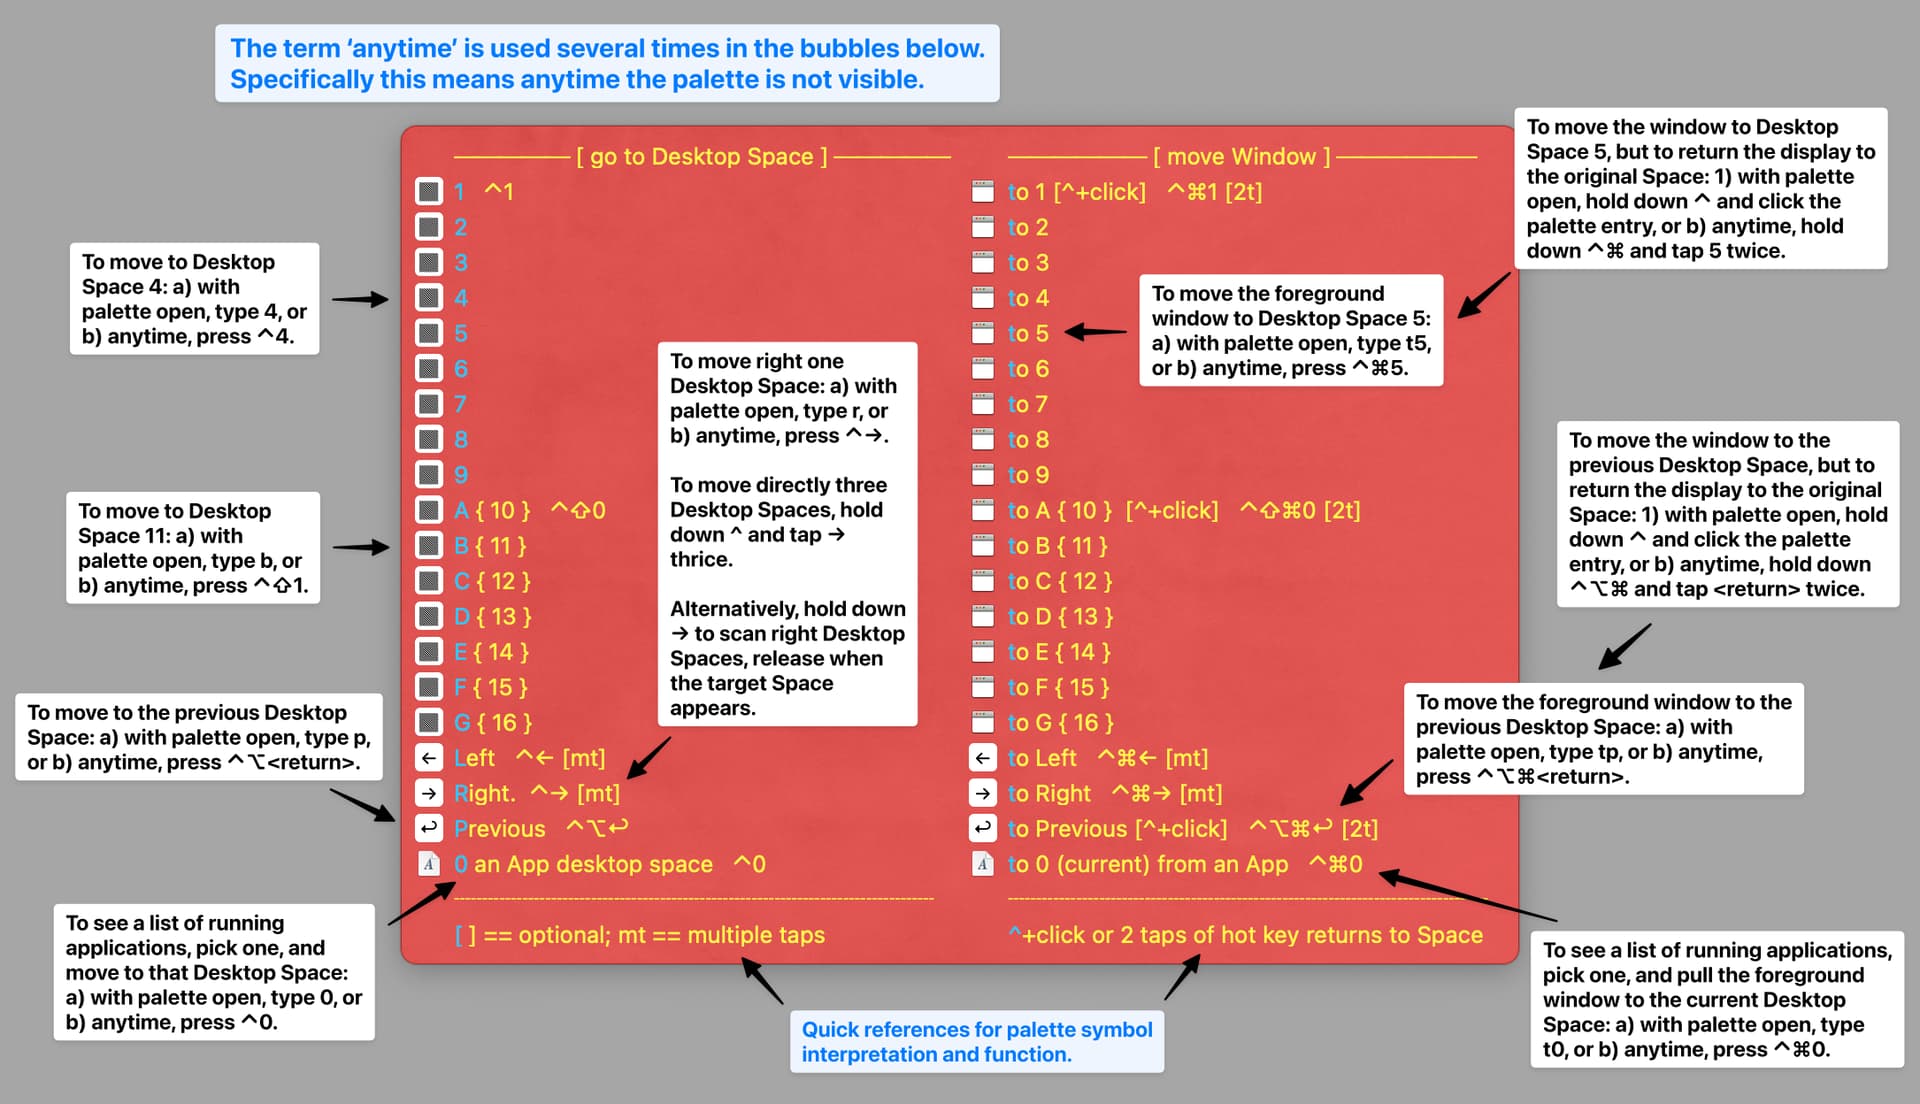
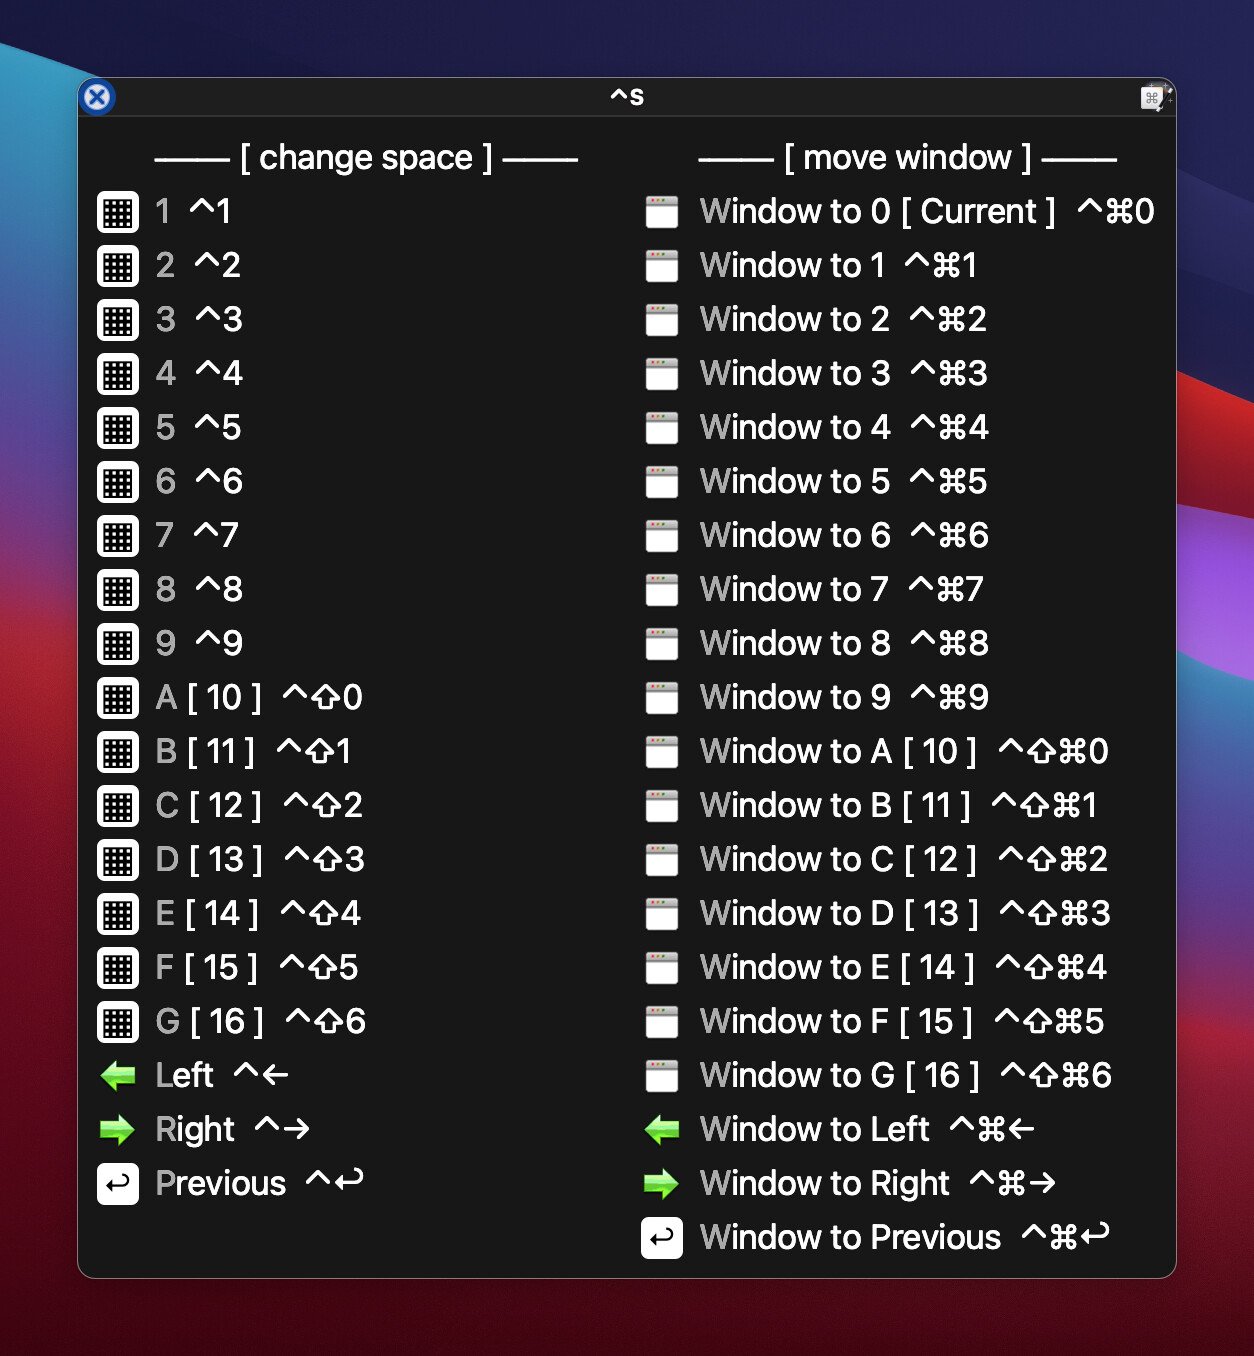
- The optional Conflict Palette (⌃S) displays all of the hot keys for the nine underlying macros. The forty-two Conflict Palette macros have been simplified to use the Trigger Macros by Hot Key action
- Most of the functionality of these macros will now work independent of WhichSpace. However, without it, the following features will be absent:
-
The visual indication of the Desktop Number rendered by WhichSpace on the macOS menubar
-
The tracking of the current and previous Desktop will be temporarily inaccurate if a Desktop change occurs outside the control of the macros. For example,
- three-finger swipe left or right on a trackpad
- Mission Control is displayed and a Desktop is selected
- a macOS application is opened, or activated, and an automatic Desktop change occurs (see Note 1)
So what’s the impact? Go to Previous Desktop (⌃Return) will return to the last Desktop that was displayed using a macro hot key. For example:
- Moved to Desktop 4 using ⌃4
- Moved to Desktop 3 using a three-finger swipe on the trackpad
- Moved to Desktop 1 using ⌃1
- Go to Previous Desktop (⌃Return) would move to Desktop 4 (not Desktop 3)
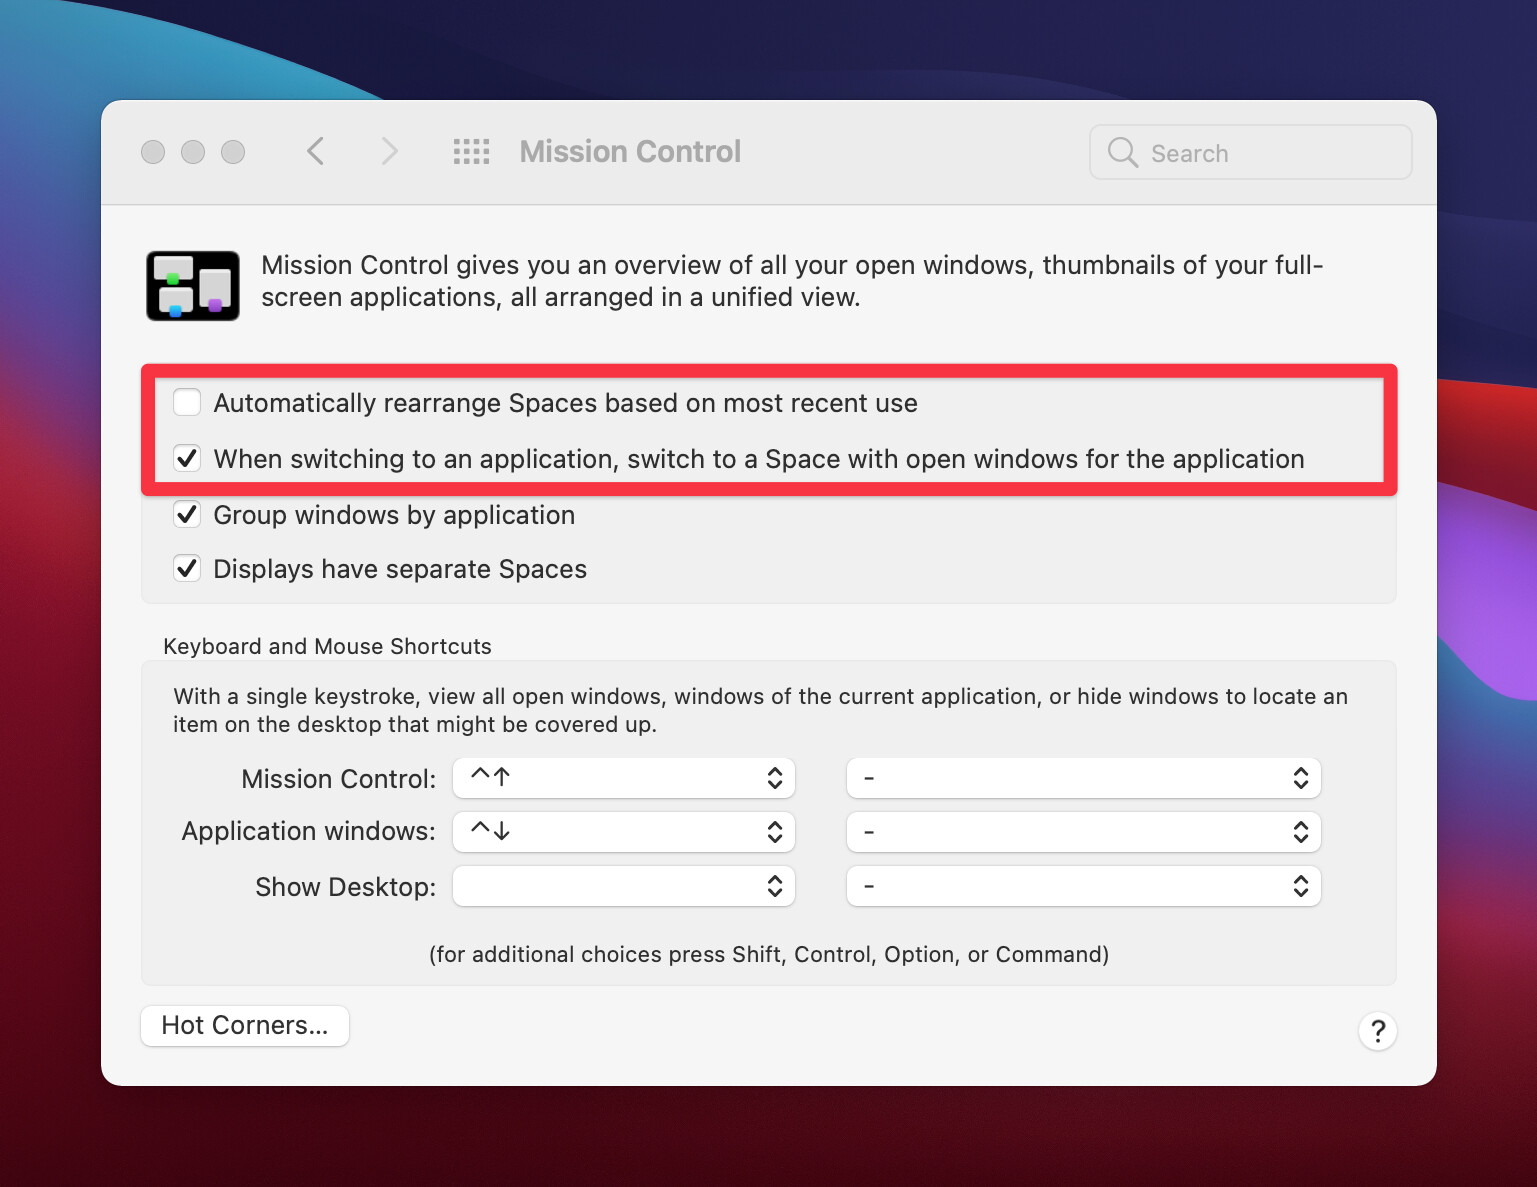
Note 1: This can occur when the following is selected (highly recommended): System Preferences > Mission Control > When switching to an application, switch to a Space with open windows for the application
Nine Primary Macros
This section includes more information and images for each of the nine primary macros. The Go to Previous Desktop section provides a comprehensive explanation for those interested in the inner workings. This information is also available in the comments of each macro.
All nine macros can be downloaded as a group using the link in the Quick Start section.
Macro: Go to Desktop N
This macro is used to directly move to one of the sixteen Desktops.
Go to Desktop 1 .. 9                             ⌃1 .. ⌃9
Go to Desktop 10 .. 16                           ⌃⇧0 .. ⌃⇧6
More
PREREQUISITE SETTINGS
This macro requires up to the 16 native macOS keyboard shortcuts below to be set (System Preferences > Keyboard > Shortcuts > Mission Control). These must be set as Desktop Spaces are added.
Switch to Desktop 1 .. 9                         ⌃⌥⌘1 .. ⌃⌥⌘9
Switch to Desktop 10 .. 16                       ⌃⌥⇧⌘0 .. ⌃⌥⇧⌘6
TESTED WITH
• Big Sur, v11.2.2
• Keyboard Maestro, v9.2
• MacBookPro16,1
VERSION HISTORY
1.0 - Initial version

Macro: Go Left a Desktop
This macro is used to move left one or more Desktops.
Go Left a Desktop ⌃Left Arrow
In addition to a single press of ⌃Left Arrow, multiple taps of the Left Arrow (while ⌃ is down) will be recognized. Also, if ⌃Left Arrow is held down, the movement left is repeated until released.
More
PREREQUISITE SETTINGS
This macro requires up to the 16 native macOS keyboard shortcuts below to be set (System Preferences > Keyboard > Shortcuts > Mission Control). These must be set as Desktop Spaces are added.
Switch to Desktop 1 .. 9                         ⌃⌥⌘1 .. ⌃⌥⌘9
Switch to Desktop 10 .. 16                       ⌃⌥⇧⌘0 .. ⌃⌥⇧⌘6
ACKNOWLEDGEMENT
The multiple-tap capability of this macro is provided by MACRO: HotKey Multi-Press Template, by @Dan Thomas.
TESTED WITH
• Big Sur, v11.2.2
• Keyboard Maestro, v9.2
• MacBookPro16,1
VERSION HISTORY
1.0 - Initial version

Macro: Go Right a Desktop
This macro is used to move right one or more Desktops.
Go Right a Desktop ⌃Right Arrow
In addition to a single press of ⌃Right Arrow, multiple taps of the Right Arrow (while ⌃ is down) will be recognized. Also, if ⌃Right Arrow is held down, the movement right is repeated until released.
More
PREREQUISITE SETTINGS
This macro requires up to the 16 native macOS keyboard shortcuts below to be set (System Preferences > Keyboard > Shortcuts > Mission Control). These must be set as Desktop Spaces are added.
Switch to Desktop 1 .. 9                         ⌃⌥⌘1 .. ⌃⌥⌘9
Switch to Desktop 10 .. 16                       ⌃⌥⇧⌘0 .. ⌃⌥⇧⌘6
ACKNOWLEDGEMENT
The multiple-tap capability of this macro is provided by MACRO: HotKey Multi-Press Template, by @Dan Thomas.
TESTED WITH
• Big Sur, v11.2.2
• Keyboard Maestro, v9.2
• MacBookPro16,1
VERSION HISTORY
1.0 - Initial version

Macro: Go to Previous Desktop
This macro is used to return to the previously displayed Desktop.
Go to Previous Desktop ⌃Return
For example, if Desktop 5 is visible and ⌃2 is used to move to Desktop 2, ⌃Return will return to Desktop 5. Since a second ⌃Return will move back to Desktop 2, this macro makes it easy to toggle between two Desktops, even if they are nonadjacent.
Note: If the macro is triggered with the ⌥ (Option key) down, the desktop change will not occur; instead a brief message will appear indicating the previously displayed Desktop.
More
PREREQUISITE SETTINGS
This macro requires up to the 16 native macOS keyboard shortcuts below to be set (System Preferences > Keyboard > Shortcuts > Mission Control). These must be set as Desktop Spaces are added.
Switch to Desktop 1 .. 9                         ⌃⌥⌘1 .. ⌃⌥⌘9
Switch to Desktop 10 .. 16                       ⌃⌥⇧⌘0 .. ⌃⌥⇧⌘6
 OPERATIONAL DETAILS
According to this comment from @peterlewis, the Desktop number is not available via macOS public API, thus there is no native Keyboard Maestro action for this purpose. However, when Desktop navigation and window movement are done exclusively with this macro and the others in the macro group (see Note 1) the current and previous Desktop numbers are accurately tracked and saved using Keyboard Maestro global variables. This is useful and often sufficient but there will be times when a Desktop change occurs outside the domain of the macros in this group. For example:
a. three-finger swipe left or right on a trackpad
b. Mission Control is displayed and a Desktop is selected
c. a macOS application is opened, or activated, and an automatic Desktop change occurs (see Note 2)
In these cases, and possibly others, the tracking of the current and previous Desktop will be temporarily inaccurate (see Note 3) unless a helper application named WhichSpace is installed. (This installation is highly recommended, but not required.)
WhichSpace is a free, open source application by George Christou that displays the Desktop number in the macOS menubar. This indication is of great value when using multiple Desktops. As a bonus and employed within this macro, the Desktop number can be determined with a simple AppleScript (see Note 4).
Note 1: Other macros in this macro group are:
Go Left a Desktop, Go Right a Desktop, Go to Desktop N, Move Application Window to Current Desktop, Move Window Left a Desktop, Move Window Right a Desktop, Move Window to Desktop N, Move Window to Previous Desktop)
Note 2: Automatic Desktop changes can occur when the following is selected: System Preferences > Mission Control > When switching to an application, switch to a Space with open windows for the application
Note 3: If WhichSpace is not installed, current and previous Desktops can be temporarily inaccurate. For example:
a. Move to Desktop 4 using macro Go to Desktop N (⌃4).
b. Move to Desktop 3 using trackpad
c. Move to Desktop 1 using macro Go to Desktop N (⌃1).
d. Running this macro, Go to Previous Desktop (⌃Return) would move to Desktop 4, not Desktop 3.
Note 4: When WhichSpace is installed, this macro records a desktop change by detecting if the focused window title changes. Generally this works well because when a desktop change occurs (even outside the control of the macros in this group) different applications or at least different windows within the same application are made automatically active or selected by a user. However, there may be rare situations when a desktop change is made, outside the domain of these macros, and the window title does not change, thus the previous and current Desktop tracking will be temporarily inaccurate.
TESTED WITH
• Big Sur, v11.2.2
• Keyboard Maestro, v9.2
• MacBookPro16,1
VERSION HISTORY
1.0 - Initial version

Macro: Move Window to Desktop N
This macro is used to move the active window to one of the sixteen Desktops.
Move Window to Desktop 1 .. 9                    ⌃⌘1 .. ⌃⌘9
Move Window to Desktop 10 .. 16                  ⌃⇧⌘0 .. ⌃⇧⌘6
The macro completes the move by invoking a click-and-hold on the upper-left of the window followed by typing the keystroke that moves to the target space. Then after a short pause, the click is released and the mouse is returned to its original position.
More
PREREQUISITE SETTINGS
This macro requires up to the 16 native macOS keyboard shortcuts below to be set (System Preferences > Keyboard > Shortcuts > Mission Control). These must be set as Desktop Spaces are added.
Switch to Desktop 1 .. 9                         ⌃⌥⌘1 .. ⌃⌥⌘9
Switch to Desktop 10 .. 16                       ⌃⌥⇧⌘0 .. ⌃⌥⇧⌘6
ACKNOWLEDGEMENT
The logic in this macro was taken from Move Frontmost Window to a Different Space, by @Tom.
Two modifications were made for this macro:
- Expanded to accommodate up to 16 Desktop Spaces
- Added logic to exit immediately if the shortcut is invoked in a space without windows
Due to the above changes, the name was changed from Move Frontmost Window to a Different Space to Move Window to Desktop N.
TESTED WITH
• Big Sur, v11.2.2
• Keyboard Maestro, v9.2
• MacBookPro16,1
VERSION HISTORY
1.0 - Initial version

Macro: Move Window Left a Desktop
This macro is used to move the active window left one or more Desktops.
Move Window Left a Desktop ⌃⌘Left Arrow
In addition to a single press of ⌃⌘Left Arrow, multiple taps of the Left Arrow (while ⌃⌘ are down) will be recognized. Also, if ⌃⌘Left Arrow is held down, the movement left is repeated until released.
More
PREREQUISITE SETTINGS
This macro requires up to the 16 native macOS keyboard shortcuts below to be set (System Preferences > Keyboard > Shortcuts > Mission Control). These must be set as Desktop Spaces are added.
Switch to Desktop 1 .. 9                         ⌃⌥⌘1 .. ⌃⌥⌘9
Switch to Desktop 10 .. 16                       ⌃⌥⇧⌘0 .. ⌃⌥⇧⌘6
ACKNOWLEDGEMENT
The multiple-tap capability of this macro is provided by MACRO: HotKey Multi-Press Template, by @Dan Thomas.
TESTED WITH
• Big Sur, v11.2.2
• Keyboard Maestro, v9.2
• MacBookPro16,1
VERSION HISTORY
1.0 - Initial version

Macro: Move Window Right a Desktop
This macro is used to move the active window right one or more Desktops.
Move Window Right a Desktop ⌃⌘Right Arrow
In addition to a single press of ⌃⌘Right Arrow, multiple taps of the Right Arrow (while ⌃⌘ are down) will be recognized. Also, if ⌃⌘Right Arrow is held down, the movement left is repeated until released.
More
PREREQUISITE SETTINGS
This macro requires up to the 16 native macOS keyboard shortcuts below to be set (System Preferences > Keyboard > Shortcuts > Mission Control). These must be set as Desktop Spaces are added.
Switch to Desktop 1 .. 9                         ⌃⌥⌘1 .. ⌃⌥⌘9
Switch to Desktop 10 .. 16                       ⌃⌥⇧⌘0 .. ⌃⌥⇧⌘6
ACKNOWLEDGEMENT
The multiple-tap capability of this macro is provided by MACRO: HotKey Multi-Press Template, by @Dan Thomas.
TESTED WITH
• Big Sur, v11.2.2
• Keyboard Maestro, v9.2
• MacBookPro16,1
VERSION HISTORY
1.0 - Initial version

Macro: Move Window to Previous Desktop
This macro is used to move the active window to the previously displayed Desktop.
Move Window to Previous Desktop ⌃⌘Return
For example, if Space 5 is visible and ⌃2 is used to move to Space 2, ⌃⌘Return will move the active window on Space 2 to Space 5. Since a second ⌃⌘Return will move the window back to Space 2, this macro makes it easy to toggle between two Desktop Spaces, even if they are nonadjacent.
Note: If the macro is triggered with the ⌥ (Option key) down, the window move will not occur; instead a brief message will appear indicating the previously displayed Desktop.
More
PREREQUISITE SETTINGS
This macro requires up to the 16 native macOS keyboard shortcuts below to be set (System Preferences > Keyboard > Shortcuts > Mission Control). These must be set as Desktop Spaces are added.
Switch to Desktop 1 .. 9                         ⌃⌥⌘1 .. ⌃⌥⌘9
Switch to Desktop 10 .. 16                       ⌃⌥⇧⌘0 .. ⌃⌥⇧⌘6
TESTED WITH
• Big Sur, v11.2.2
• Keyboard Maestro, v9.2
• MacBookPro16,1
VERSION HISTORY
1.0 - Initial version

Macro: Move Application Window to Current Desktop
This macro is used to move a window from another Desktop to the current Desktop.
Move Application Window to Current Desktop ⌃⌘0
When the macro is invoked, a list of running applications will appear in a prompt list. When one of the applications is selected, the macro will move to the Desktop where the active window for the applications appears. The window will then be moved to the current Desktop.
The window move is done by invoking a click-and-hold on the upper-left of the window followed by typing the key stroke that moves back to the current Desktop. Then after a momentary pause, the click is released and the mouse is returned to its original position.
More
PREREQUISITE SETTINGS
This macro requires up to the 16 native macOS keyboard shortcuts below to be set (System Preferences > Keyboard > Shortcuts > Mission Control). These must be set as Desktop Spaces are added.
Switch to Desktop 1 .. 9                         ⌃⌥⌘1 .. ⌃⌥⌘9
Switch to Desktop 10 .. 16                       ⌃⌥⇧⌘0 .. ⌃⌥⇧⌘6
OTHER DEPENDENCIES
a. The following must be set: System Preferences > Mission Control > When switching to an application, switch to a Space with open windows for the application.
b. The Activate an Application by Name action, available by a custom Keyboard Maestro Plug-in, by @ComplexPoint, must be installed.
OPERATIONAL DETAILS
When the window switching occurs during the execution of this macro, the previous Desktop will be updated to the Desktop that includes the target application window (see Note 1). This default behavior is normally desirable as it makes it easy to return the moved window to its original Desktop using the macro Move Window to Previous Space (⌃⌘Return).
In rare situations it may be desirable to preserve the pre-window move previous Desktop. To do this, include the ⌥ (Option) key when launching this shortcut.
Note 1: If WhichSpace is not running, this update of the previous Desktop will not occur. For more WhichSpace information, refer to the the macro Go to Previous Desktop.
APPLICATIONS TO EXCLUDE
By default, this macro will ignore two applications: LaunchBar and Amphetamine. To add others, modify the list in the specified action below.
TESTED WITH
• Big Sur, v11.2.2
• Keyboard Maestro, v9.2
• MacBookPro16,1
VERSION HISTORY
1.0 - Initial version


 As well as generating materials to put in the above-mentioned presentations.