I hate to sound like a Newbie but I can’t crack this.
I use a CLI tool called GAM to manage my Google Workspace domains and I’d like to build Shortcuts to run on my Mac that will collect some options, build a command and then run it in a Terminal window. However, I can’t figure out how to make this happen.
Without knowing exactly what it is you are trying to do and what exactly it is you are having trouble with, it is going to make it tough to give specifc advice.
For example if your issue was working with the Terminal app, maybe use of a shell script action might be an option?
If your issue is building the command, the documentation and what it is you want the commend to do would be necessary.
If #2 is all you have trouble with, then look at the shell script action rather than how to interact with the terminal app.
The terminal app is running an interactive shell where you could provide input, whereas the shell action in Shortcuts will run a non-interactive shell, executing a sequence of one or more preset commands. Since you are doing all the interaction in Shortcuts and just need the command executed, that should be just fine for your needs.
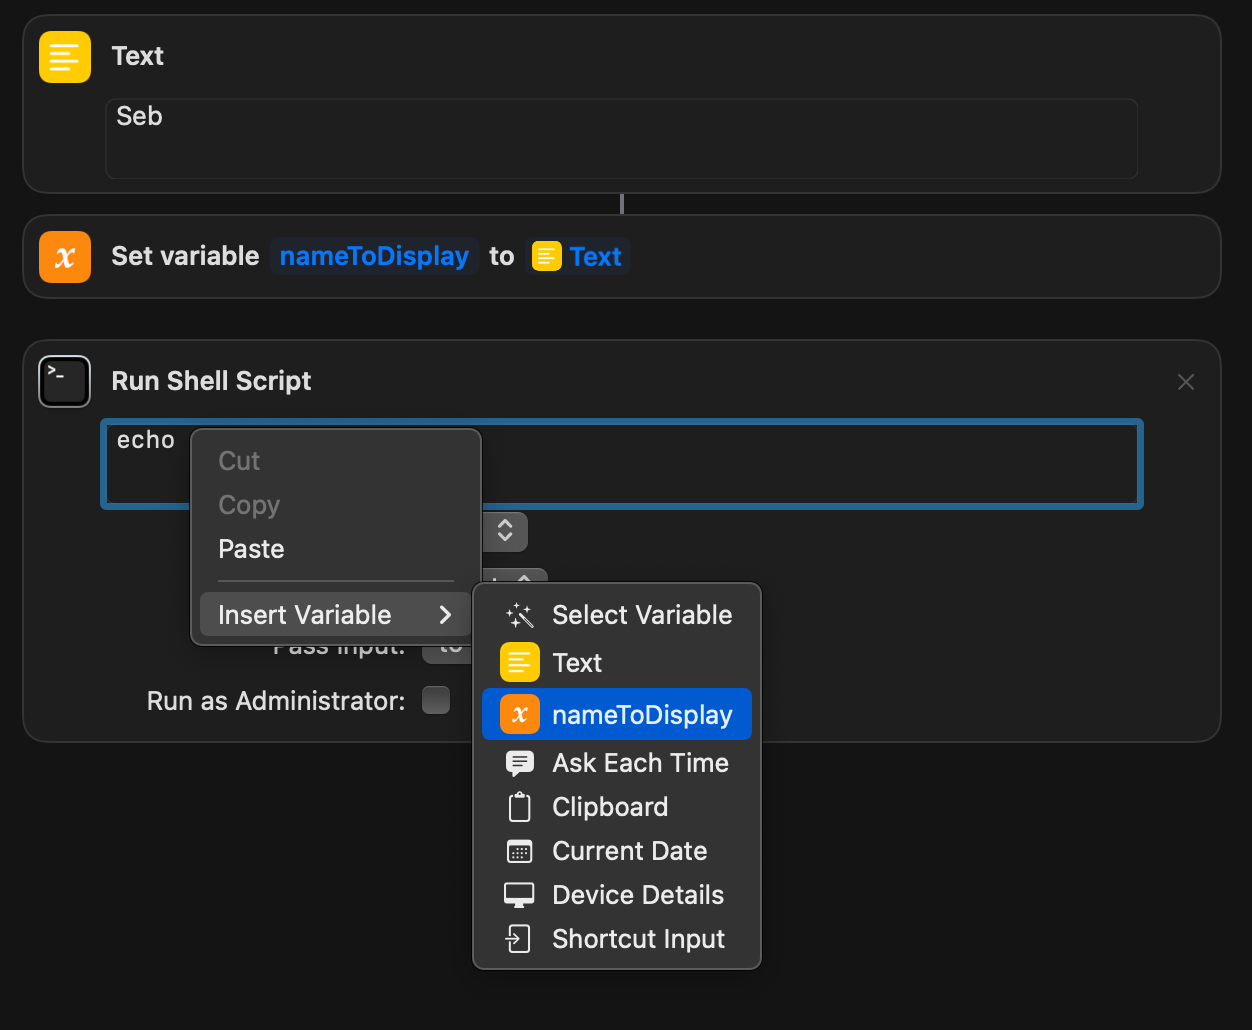
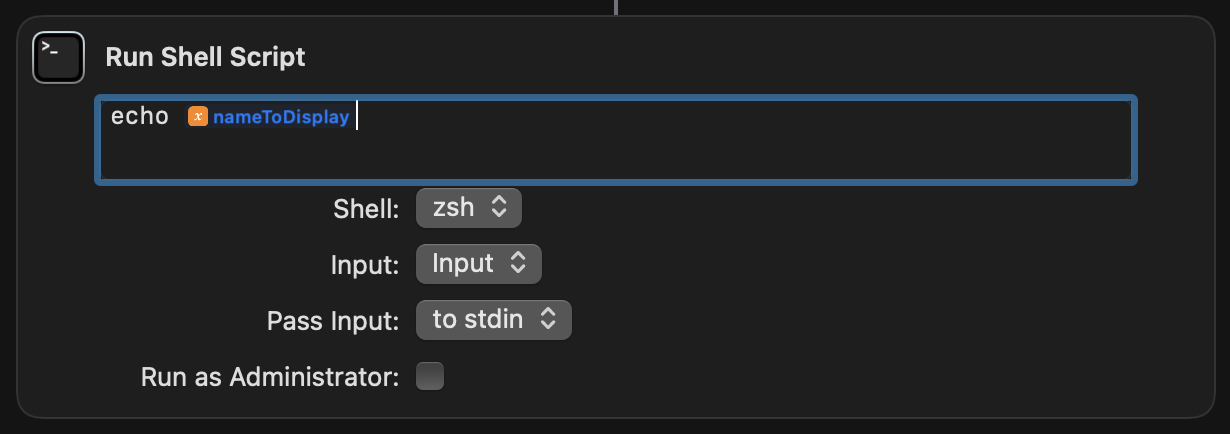
In case it helps I recently learned how to “inject” Shortcuts text into a terminal command, just right click on the text and add it from the list of variables
I know this is some time on from the original request, but I’d like to run the caffeinate command in Terminal via an Apple Shortcut. This appears to need the actual Terminal window open to work (ie cannot run in a non-interactive shell). I just can’t figure out how to pass the text into the Terminal window. Any thoughts?
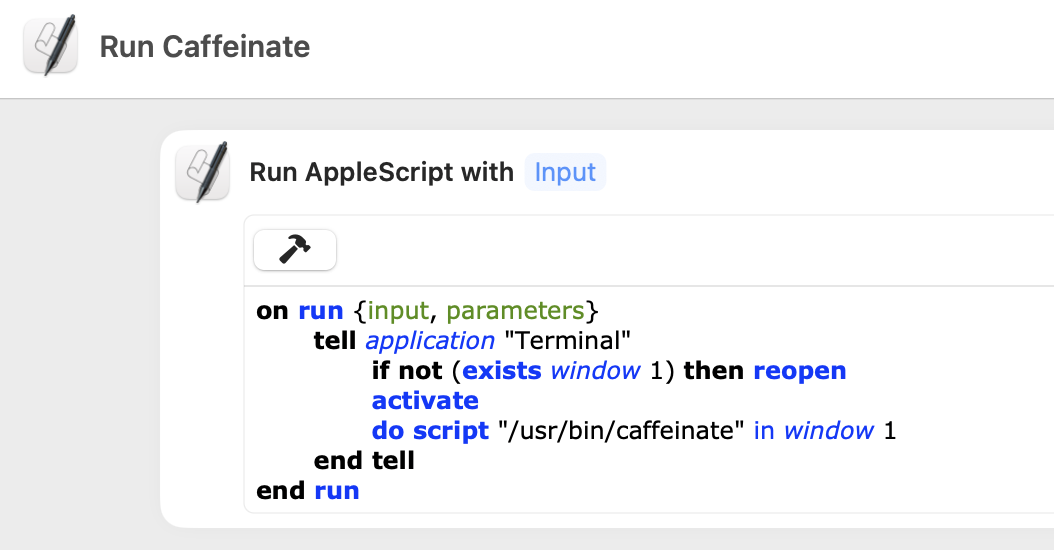
You don’t need to run Caffeinate in an open Terminal window, it can run in the background. I made a Shortcut for this. If I run it the fist time it starts Caffeinate and if I run it a second time it kills it.
But if you want a Terminal window to be opened with Shortcuts, you can make the following Shortcut:
on run {input, parameters}
	tell application "Terminal"
		if not (exists window 1) then reopen
		activate
		do script "/usr/bin/caffeinate" in window 1
	end tell
end run
As you can see it does that with help of some AppleScript.
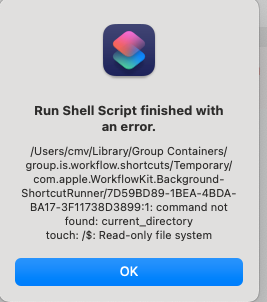
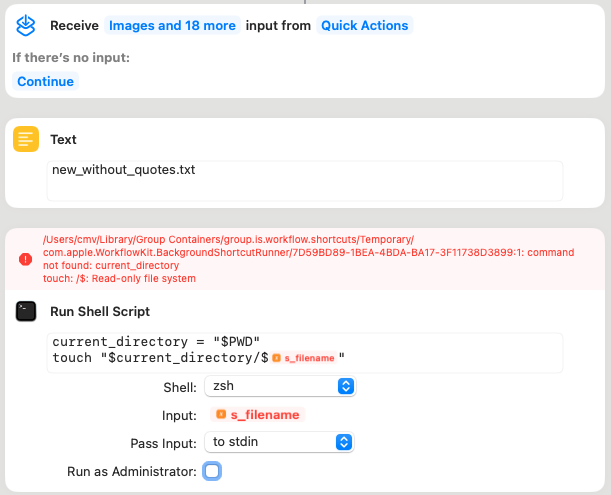
I was able to create a .txt file mostly as you say (no need to enter quotes for just creating it in the default folder - mine the user folder). But I can’t manage to make it creating it in the current folder. I’ll probably don’t know how to pass the path variable:
You need to remove the space after $current_directory because as it is you’re accidentally asking it to touch two files ($current_directory on the one hand and $s_filename on the other).
On top of that, it seems that s_filename contains “.txt” at the time of running, which isn’t a good sign. I don’t entirely understand why only “.txt” stays here since it should contain “new_without_quoted.txt”.
Finally, you can remove s_filename as input, it’s not necessary.
Always best to share the actual shortcut rather than a screenshot. Sometimes it helps with hidden attributes. Sometimes it just saves people having to reproduce everything character by character.
There looks to be a mix of inputs, an overly broad range of shortcuts inputs, direct access and something wrong with the working directory (which is then output in the error - you’ll note it is a temporary folder not the input location).
The issue with the directory is a mistake in the first line of your script. The following shortcut illustrates this, including how Shortcuts is interpreting the result … leading to the temporary folder use.
If that does not suit your purposes then I would recommend you start a new topic (you can link back to this one), set out your scenario, and anywhere you having trouble.
I’ve tried yours and I didn’t get an error, but I only get a window where I can select a file, but nothing is done with it (that I noticed). My intention is to create a shortcut that creates a new file inside the folder I’m currently in.
But I’ll open a new thread later about it with a link to this one and with the actual shortcut as you proposed (wasn’t aware of that they could be shared -easily).
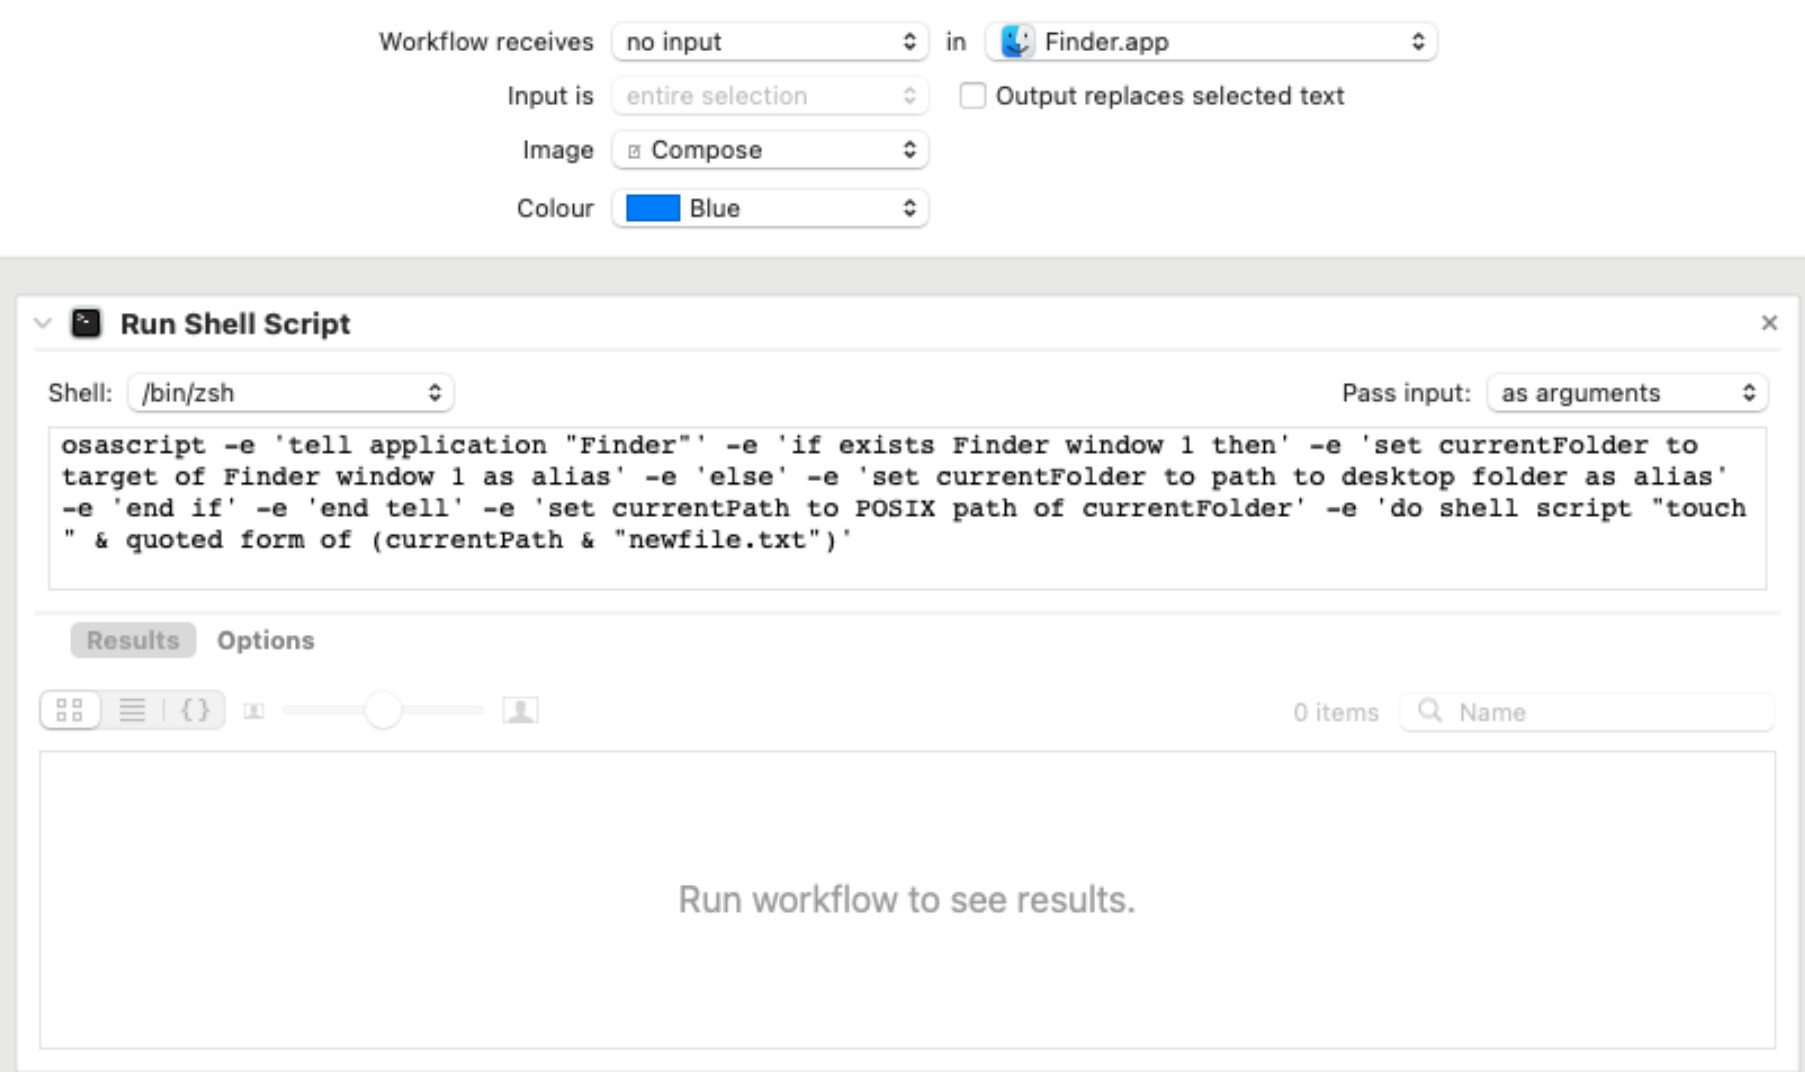
It is set as a quick action like yours. Try triggering it from a file or folder in Finder. The script should take the directory of what is passed in, and use that to create th new file alongside it in the same folder.
Hi sylumer. This wasn’t working for some reason, but I appreciate a lot your help: i almost accidentally found out a way to do it that worked for me both in Shortcuts and Automator, so I’m sharing it here. This opens a new file in the currently opened directory in Finder (no need to go to parent folder and select the folder):
Wait, isn’t there a way to share these files in this forum? It says it only accepts .png and a few other very standard files, so I cannot share the .workflow (from automator) and it seems one cannot access a Shortcuts file directly, so I’m sharing an iCloud link: shortcut to create .txt file in current finder window
You’ll need to drag the shortcut to Quick Actions
Then you can use it from Finder / Services / Name of the shortcut when you are in a Finder window.
The code is the same in the Shortcut I linked to (removing the first and the last two lines in the shortcu and adding the -e on each line like in the pic).
It was working to my understanding of the requirements, so it would be useful to find out what it was not doing for you, or if it wasn’t doing anything at all, exactly how you used it. I have a dislike for loose ends.
iCloud links are the standard way to share shortcuts.
Automator workflows you have to host externally (typically Zip’d as they are a package of files to many hosting services) and then share a link to them on the forum.
I didn’t remember, so I’ve reinstalled and replicate it again and… it does work if you select a file. The problem I guess it was that I was trying to select a folder, as that’s what I was aiming for -creating a .txt in a folder. And I was doing it from Services.
When you selected a file it does work though (video), yet, sometimes you don’t have a file and I was trying to just select a folder (video). I’ve seen now that you could select the file folder and then select the Services / shortcut and that windows doesn’t show up, but I didn’t see it at the time. I’d probably have used it like that, but in case it is useful for anyone, the version I posted doesn’t require to select anything which was totally adapted to what I was looking for. The code in the shortcut you posted is shorter and easier to understand though. Anyway, I learnt a lot from you, and wouldn’t have been able to do it without your help. Many thanks!
Related to the topic for others struggeling to run code in Siri Shortcuts and Automator:
I am using anaconda so this is what I paste into Automator, then I replace print with my code and it works!
/Users/HOMEFOLDER/anaconda3/bin/python <<EOF import sys
print(“RUN any ANACONA SCRIPT HERE!”)
EOF
Siri Shortcuts can be combined with shortery for full automation