Automate printing with specific print settings using Hazel & shell script

Sharing this because I was surprised to find it was such an obscure thing to accomplish.

This will allow you to print to a specific printer on your Mac, using the printer driver’s print settings you specify. This would be similar to using a “Print Preset”, but print settings and print presets are not available to things like AppleScript or Automator.

To do this, you need to use the Terminal and shell scripting. And I ultimately employ this using a Hazel action to automate it.

I piecemealed all of this together from various forums online, which is why I am collating it in one place here.

Step 1: Get Available Print Options For Your Printer

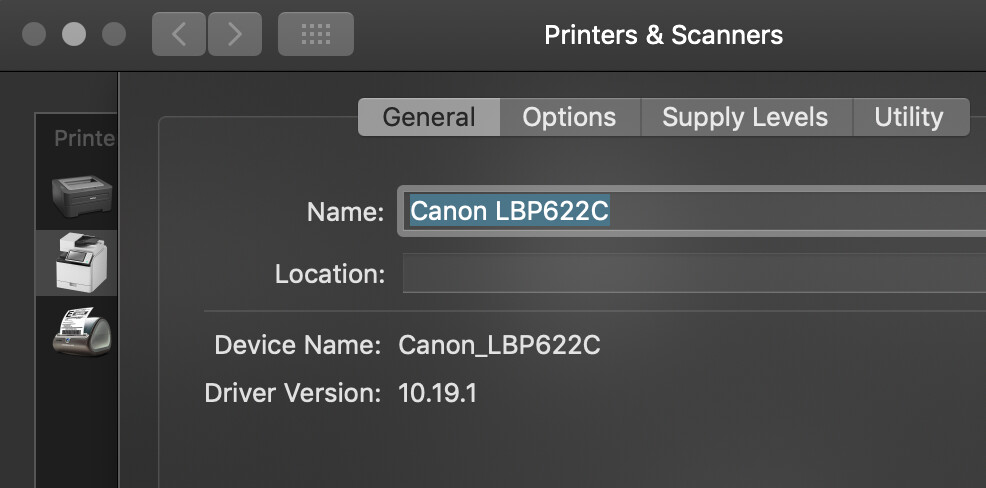
First, you need the printer’s Device Name which is in the System Preferences > Printers & Scanners section, in the General tab of the dialog sheet brought up by the “Options & Supplies” button:

In Terminal, enter:

lpoptions -p Printer_Device_Name -l

This will output a bunch of printer-specific settings you have available to use to set up your custom print settings.

See this page on the CUPS printer utility for more detail.

In short, in your shell script you want to use -o Option=Value for each setting you want to configure. Anything you do not specify will use the printer’s default settings, which seem to be indicated by the asterisk in the output of the Terminal after running the above command.

Step 2: Build The Shell Script

The generic structure of the shell script will be:

lp -d printer -o Option1=Value -o Option2=Value filename

The -d option specifies the printer, each -o option sets the options you want to customize.

Here is a sample script I am using:

lp -d Canon_LBP622C -o MediaType=PlainPaper3 -o CNTonerDensityAdjustment=True -o CNTonerDensity=11 -o CNCTonerDensity=11 -o CNMTonerDensity=11 -o CNYTonerDensity=11 filename.pdf

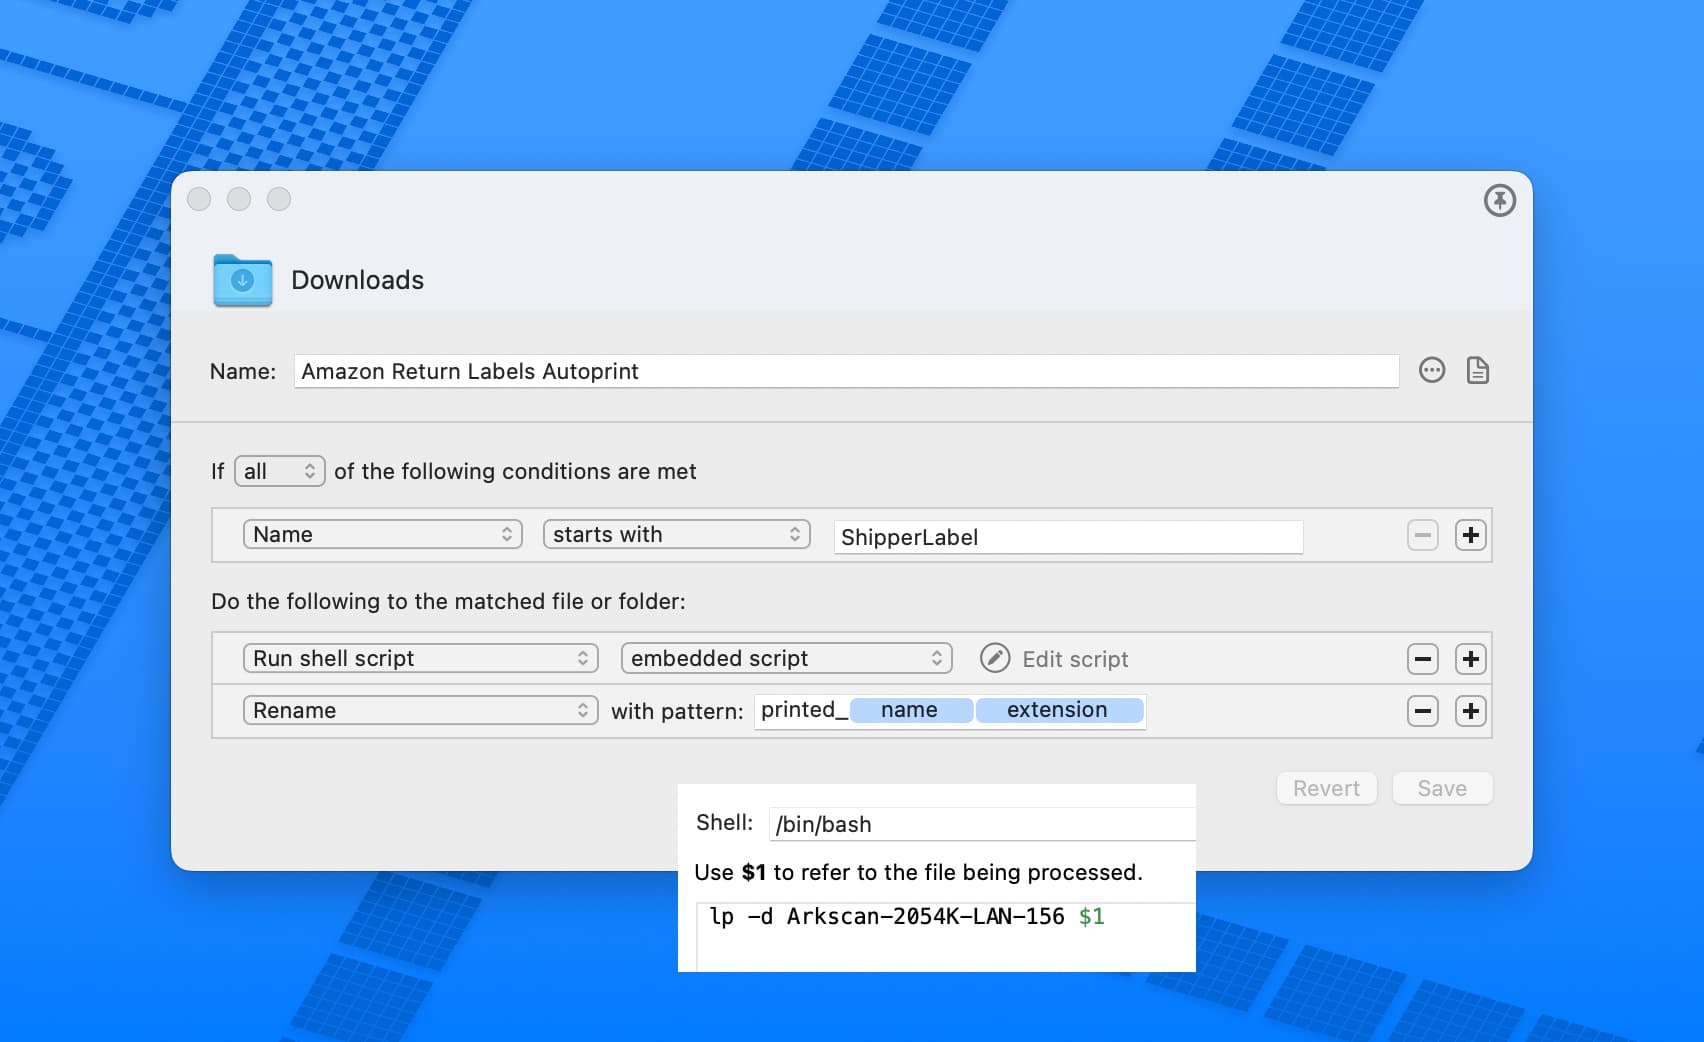
Step 3: Use the script with Hazel

For using with Hazel, and using the embedded shell script action, replace the filename with "$1" (include the quotes).

So the final script to be used in an embedded Hazel action would be:

lp -d Canon_LBP622C -o MediaType=PlainPaper3 -o CNTonerDensityAdjustment=True -o CNTonerDensity=11 -o CNCTonerDensity=11 -o CNMTonerDensity=11 -o CNYTonerDensity=11 "$1"

This would be used with a watched folder where you can drop in files, and matching files get processed by Hazel with this script.

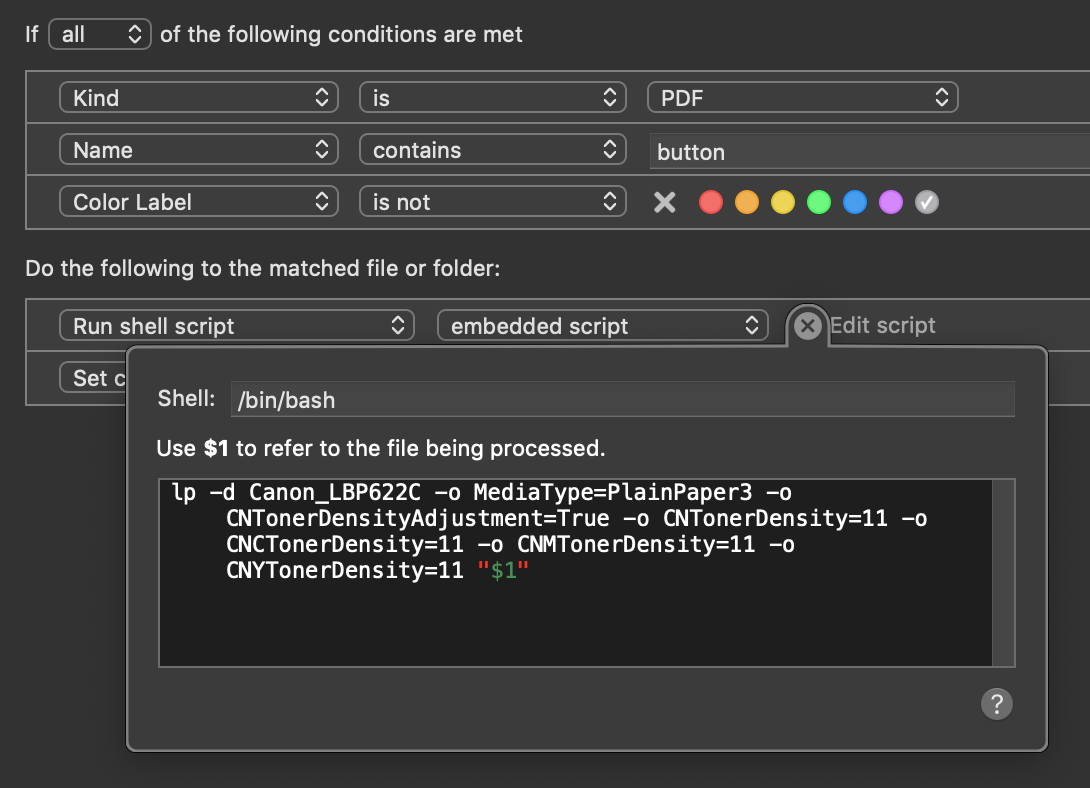
For my setup, I wanted to make sure I was using black & white printing for packing slips, but also be able to print color documents with different paper weights and toner density settings for my artwork prints.

And the ultimate goal was to be able to initiate printing from the iPad Pro, which lacks the ability to specify printer driver print settings, or access print presets using AirPrint printers.

Using Shortcuts, I copy or save the desired file into the watched folder, and depending on how the file matches the rule, it prints to the same printer using whatever settings are specified in the shell script embedded in each Hazel action.

I have one Hazel action for the packing slips print settings, and another for the files that match the art print settings, with the embedded shell script set up with the relevant options.

4 Likes

Very good! Well done.

Thank you! Too much work went into figuring this out not to share.

I have been shell scripting for a very long dang time, and lp & lpr are some of the more opaque programs that I’ve tried to do anything with. The syntax seems like it’s straight out of the 1980s.

Yeah I am a novice when it comes to shell scripting, only just started educating myself about a year ago (along with Regular Expressions).

But this entire setup in the post was duct-taped together from those wiser than me. I do not claim any mastery over lp or lpr :)

Thank you to george_c the novice. You deserve a prize. I was looking for this for quite some time.

1 Like

How can I specify what pre-set mode (Draft, etc …) to use when printing ?

Not sure I understand the question, but this will not allow you to use existing Print Presets. As far as I know, those are not available to the tools we use on macOS to automate. That’s why I built this.

Instead, this setup I shared is in essence a “print preset” in shell script. You choose all the desired settings, then run the script on the file you want to print. It will then print with those “presets” in your script.

In a Mac OS (Big Sur) print window, I have preset printer setups available. I want to select any of these preset with a shell script. Is that possible and how can I specifically do that ? I don’t know how to shell script.

Otherwise, I would like to specify the printer, the paper tray to use and to print only one side ? Can I do that ?

Thanks for helping.

Yes. Takes a look at the CUPS printer utility page linked to from the original post. It has examples for these three requirements and many more.

I read that and looks chinese to me.

If you can get me working on how I can shell script specifying the printer, the one side and the paper tray to select that would be sufficient for me. I don’t really need to specify more than that.

I think you know more than you think about the shell. If you got any earlier stuff to work by typing it in, then you are 95% of the way there, and the other 5% is covered on that page I referenced.

Try looking at thiscommand in combination with the link and step 2 in the original post.

lp -o sides=one-sided media=A4,Upper filename

sylumer … it’s kind of you to say that I am better than I think, but to me shell scripting is really like chinese. While I understand bit and pieces, even after trying, the logics does not seem to get through. I can copy and paste but still am unable to understand what I am doing really.

I specified the printer and changed the media … so I got to this: lp -d HP_OfficeJet_Pro_8740 -o sides=one-sided -o media=Lettre É.-U. -o Upper "$1"

In Hazel, the shell script is imbedded as the first condition before running the Automator printing workflow. I made a few tests that always returned an error processing message.

Can you help me go further with these items: (1) if the paper format has to be localized (in French in the code above), (2) what «Upper» stands for and (3) how to specify the first or second tray.

Got it to print with:

lp -d HP_OfficeJet_Pro_8740 -o sides=one-sided -o media=Letter -o Upper "$1"

It did print one side and from the Upper tray but I need to print from the Lower tray.

lp -d HP_OfficeJet_Pro_8740 -o sides=one-sided -o media=Letter-o Lower "$1"

… still printed from the Upper. Have a clue for this one ?

Have you tried lpoptions? It is mentioned in the reference page as away of finding out what options your printer supports.

https://www.cups.org/doc/man-lpoptions.html

For example, maybe the lower tray is a multipurpose or large capacity tray.

Hello sylumer,

Yes I did. Sorry for the late return. I displayed the FDD file to see my tray options. See the description:

Nous@iMacIntel ~ % lpoptions -p HP_OfficeJet_Pro_8740 -l

Collate/Collate: True *False

ColorModel/Color Mode: Gray DeviceGray *RGB DeviceRGB

cupsPrintQuality/Quality: Draft *Normal High

Duplex/2-Sided Printing: None *DuplexNoTumble DuplexTumble

PageSize/Media Size: 100x150mm 100x150mm.Fullbleed 184x260mm 195x270mm 3.5x5 3.5x5.Fullbleed 3x5 3x5.Fullbleed 4x6 4x6.Fullbleed 5x7 5x7.Fullbleed 5x8 A4 A4.Fullbleed A5 A5.Fullbleed A6 A6.Fullbleed B5 B5.Fullbleed DoublePostcardRotated Env10 EnvC5 EnvC6 EnvChou3 EnvChou4 EnvDL EnvMonarch Executive Executive.Fullbleed FanFoldGermanLegal FanFoldGermanLegal.Fullbleed ISOB5 Legal Legal.Fullbleed *Letter Letter.Fullbleed Oficio Postcard Postcard.Fullbleed Statement roc16k Custom.WIDTHxHEIGHT

MediaType/MediaType: stationery com.hp.ecosmart-lite com.hp.premium-presentation-matte com.hp.trifold-brochure-glossy-180gsm com.hp.brochure-matte com.hp.brochure-glossy com.hp.advanced-photo stationery-lightweight com.hp.intermediate cardstock stationery-heavyweight stationery-letterhead *any

InputSlot/Media Source: main alternate auto

The name them differently : main, alternate and auto. I tried them and it always print from the same tray.

At least we got it to print one side. That’s great. I will look into the tray case and keep you posted.

Thanks for helping.

You might also want to take a look at your local printer settings. You can often page through and display/change them on an LCD display, and even print a summary. It may be that your printer sees no distinction media-wise between the trays and is not offering up physical trays as an option through the driver. But if you change the media types, then that may be enough to help the driver distinguish them.

But, before you fiddle around with any of the above, see if this happens to work:

lp -d HP_OfficeJet_Pro_8740 -o sides=one-sided -o media=Letter -o InputSlot=alternate "$1"

sylumer,

Obvious, my dear Watson. It was so obvious. That was just it. I copycated your original comment for I don’t know the reason. Should of thought of that modification my self.

Now it works. Thank you.

Robert

I just edited this original post to fix the Terminal command that returns the list of printer-specific print options for command-line printing.

In the original, it was:

lpoptions -p printer_device_name

but it should have been:

lpoptions -p printer_device_name -l