Exporting single page from PDF as a JPG

Hi there,

My company allows us to upload our phone bills to their system so we can expense them. They’re fine with us only uploading the single page of the bill where the amount is listed. On my phone bills, this occurs on page 3. I was trying to create a Hazel/AppleScript rule that does the following:

  • It opens the bill PDF in Preview
  • Selects Page 3
  • Exports ONLY that page as a JPG

Nice to have:

  • Generates an email to my work address with the JPG as an attachment

From what I’ve read, it looks like Preview isn’t very scriptable and the app Skim doesn’t export to JPG. Is something like this possible? Thanks!

I realize you asked about a Mac solution. If, by chance, you have access to the file in iOS, here is an example Shortcut that you could build from. — jay

https://www.icloud.com/shortcuts/bb7035ced6e049e39d876fe14a1f7b26

1 Like

Honestly, that’s incredible. Thank you. I’m going to keep looking for a way to do it on the Mac if only to boost my own scripting/automation skills, but I’ll definitely be putting your shortcut to work every month. Thank you so much!

As an alternative approach, consider triggering a script from Hazel and using a command line tool to split your PDF into separate pages, then discarding all but the third. If you use your favourite search engine, you’ll find quite the array as it is a common thing to do. A common one is splitpdf.

There are also command line tools you can use to convert a PDF to a JPEG (e.g. sips, imageMagick), but I would suggest sending the PDF as is. I think it is unlikely that it needs to be a JPEG rather than a PDF. You’re sending it by e-mail, so it doesn’t matter as an attachment, and every expense system I’ve come across to date accepts PDF copies for receipts; though there is always a first time to find one that doesn’t.

Once you have the file, you should also be able to try sending that from the same script.

Hope that helps.

The following command (based on this answer on StackExchange) extracts page 3 from indata.pdf to outdata.pdf. You can modify the page(s) extracted by changing the values for -dFirstPage and -dLastPage, which should be self-explanatory.

gs -dNOPAUSE -dBATCH -dFirstPage=3 -dLastPage=3 -sDEVICE=pdfwrite -sOutputFile=outdata.pdf -f indata.pdf

Note that outdata.pdf is extracted non-destructively, meaning that it is still vectorized. If your company’s system allows you to upload .pdf files, you are good to go. Otherwise, you can convert the generated file to a rasterized (pixelated) jpg using the following command:

convert -density 300 outdata.pdf -resize 1024 -background white -alpha remove outdata.jpg

(Note that convert, is part of Imagemagick, which has to be installed separately (link to instructions))

For ease of use, this could be combined into a single shell script with the following content:

#!/bin/bash

gs -dNOPAUSE -dBATCH -dFirstPage=$2 -dLastPage=$2 -sDEVICE=pdfwrite -sOutputFile=~/Desktop/outdata.pdf -f $1
convert -density 300 ~/Desktop/outdata.pdf -resize 1024 -background white -alpha remove ~/Desktop/outdata.jpg
rm ~/Desktop/outdata.pdf

Follow these steps:

  1. Open Terminal.
  2. Run nano extract_pdf_page.
  3. Copy the content above and paste into the file.
  4. Save the file by pressing ctrl-X, followed by Y and Enter.
  5. Run chmod 755 extract_pdf_page to make the file executable.
  6. Run mv extract_pdf_page /usr/local/bin to make Terminal “see” your new script.
  7. Close the Terminal window.

Now, when you want to extract page 3 from your file phone_bill.pdf, located in your downloads folder, do the following:

  1. Open Terminal.
  2. Run cd Downloads
  3. Run extract_pdf_page phone_bill.pdf 3

The file output.jpg will shortly appear in the downloads folder.

2 Likes

Immediately after posting my previous post, I thought to myself: “this could be turned into an Automator service”. A few minues later and it is complete!

Unfortunately, uploading .zip files to the forum is forbidden, so I cannot share it that way. Instead, I show how it can be recreated:

  1. Open Automator.
  2. Create new document.
  3. Select “Service” from the list of options.
  4. Set the workflow to accept PDFs from all applications.
  5. In the library, search for “run shell script”.
  6. Drag “run shell script” to the right.
  7. Change the shell to /bin/bash from the drop-down menu.
  8. Change “Pass Inputs” to “as arguments”.
  9. Copy and paste the following to the script:
cd ~/Desktop
for f in "$@"
do

	/usr/local/bin/gs -dNOPAUSE -dBATCH -dFirstPage=3 -dLastPage=3 -sDEVICE=pdfwrite -sOutputFile=outdata.pdf -f $f
	/usr/local/bin/convert -density 300 outdata.pdf -resize 1024 -background white -alpha remove outdata.jpg
	rm outdata.pdf

done
  1. Save the file as Export Third Page and exit Automator.

Now, you can right-click on any PDF file and from the menu select Services->Export Third Page. A few seconds later, the file output.jpg will appear on your desktop.

1 Like

Thanks for the tip! I looked into splitPDF and found that there’s an automator workflow step called Split PDF. Here’s what I did - it’s kludgy, but it works for now:

  1. Create automator workflow with a single step:

  2. Saved workflow and imported into Hazel rule:

  3. Created a second rule to delete all non-page 3 files, leaving only the page 3 PDF

Like I said - this is clunky and ugly, but it works. And you’re right - I can just upload the new PDF to the expense system instead of doing a bunch of conversion. My HR person mentioned we can upload single images of the one page, so that’s what I had stuck in my head, but a PDF works just as well. Now to get it to automatically email me.

Thank you!

This is hella cool. I want to dig into this more. Thanks!!

No problems! :blush:

UPDATE: Using the AppleScript at the bottom of this post, I was able to address the auto-send component of my request: Help on a Mac Automator Workflow - Add Attachment to Email - #6 by hawks28

Here’s the code for anyone else who wants to use it, but doesn’t want to retype it from the image like I had to ;))

set theAttachment1 to (POSIX path of theFile)
set subject_ to "Phone Bill"
set the_content to "Here's your phone bill. Have a great day!"

tell application "Mail"
set newMessage to make new outgoing message with properties {subject:subject_, content:the_content & return & return}
tell newMessage
set visible to false
set sender to "senderaddress@url.com" --<<<<----------------(* change this*)
make new to recipient at end of to recipients with properties {address:"recipientaddress@url.com"} --<<<<----------------(*change this email address too *)
make new attachment with properties {file name:theAttachment1} at after the last paragraph

delay 5

(* change save to send to send*)

send --<<<<---------------- change save to send to send or send to save to save to drafts

(* change save to send to send*)

end tell

end tell

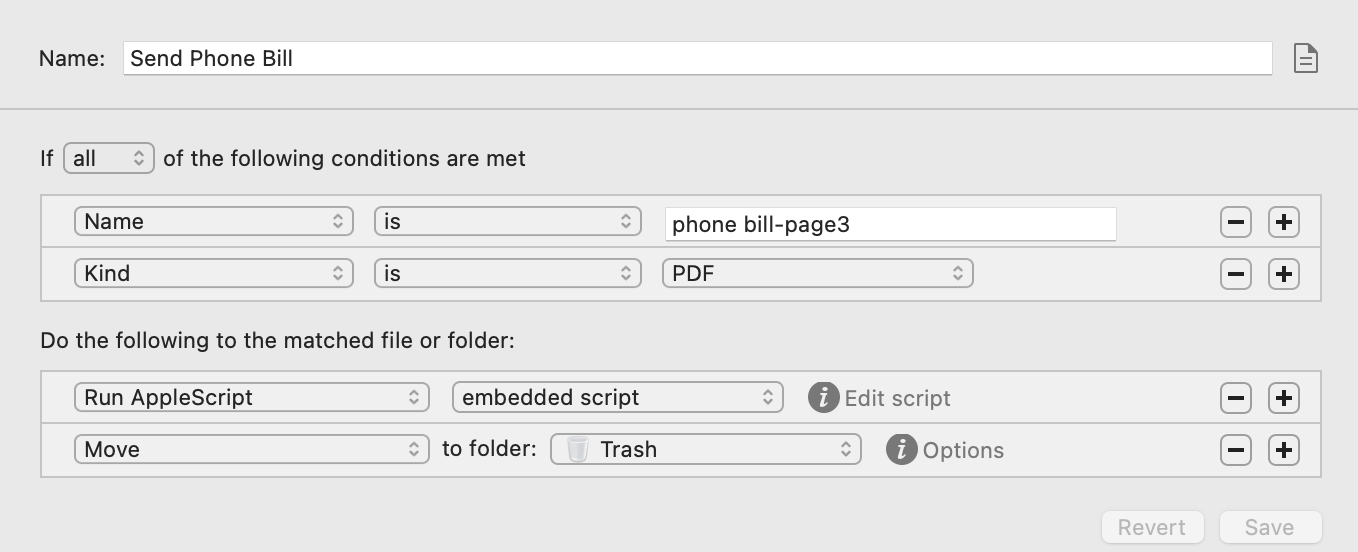
Here’s the additional Hazel rule I added, which then moves the PDF to the trash once the email has been sent.

2 Likes